Thank you! Your submission has been received!
Oops! Something went wrong while submitting the form
In Webflow, you’ll create dynamic content using two things: Collections and Fields. Collections are groups of data with Fields you (or your designer) define. Once created, you can display this content however you’d like.
In this lesson, we’ll break down the different fields you'll use in creating Collections, and walk you through the process of adding Fields to a Blog Posts Collection.
First, open the Collections panel on the left side and click the New Collection button on the top right.

Instead of naming your Collection, and then adding Fields, you can start with one of our Collection Templates, which will automatically populate all of the fields needed.

These templates include Fields and field labels that we recommend for common Collection types, but, you can customize them however you'd like.
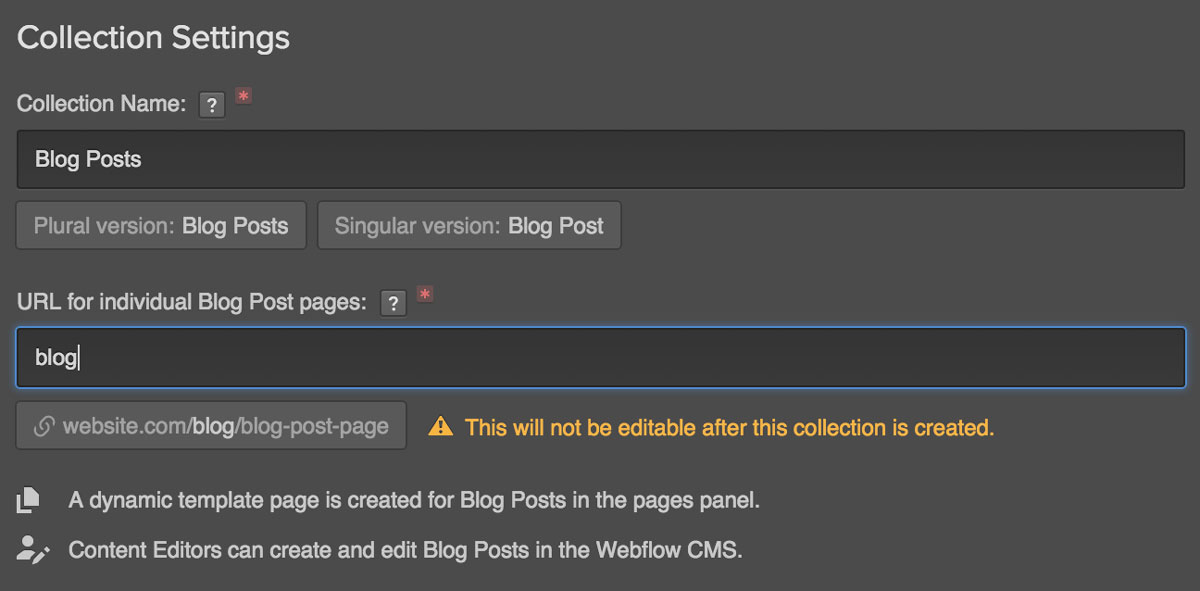
The Collection's name will be used throughout your site, so be sure to pick one that’s easy to recognize and remember. Examples include Blog Posts, Events, Team Members, or Job Listings.
Note that Webflow creates both singular and plural versions of the name: one to label the Collection (plural), and the second to label individual items in the Collection (singular). So if you create a Collection called "Blog Posts," an individual item in that collection would be labelled a "Blog Post."

The Collection URL is the text that will display as the parent to your individual item URLs. The URL will match the name of the collection by default, but you can change it to whatever makes sense for the Collection Items.
So for your Blog Posts collection, the URL/slug might be: www.website.com/blog/blog-posts-page.
Your Collection’s Fields define the various elements that make up your content.
You can add, delete, and modify Fields anytime, even after you’ve published items in a Collection. Be sure to understand how any changes might affect existing items - for example, deleting a field will delete the content from all of the items that currently use this field.

And to make things easier for your Content Editors, you can customize your Fields to define:
You can use Help Text to explain what content should go in a given field. This will only appear in the CMS, not on the public site.
You can define the minimum and maximum number of characters (with spaces) for any text Field. This will prevent long headlines or labels from breaking your design.
You can set any Field as "Required," forcing content editors to enter some value before they can publish the item.

This field is best used for for basic text content that doesn't need special formatting like headings, inline styles, or inline media like images or video. As a designer you can choose to display this field to collaborators as either a single-line input field (for shorter text) or multiple-line input field (for longer text that will have many lines).
- Short-form text that doesn't need any styling
- Names and Titles
- Team Member Bios
- Product Descriptions
- Event Descriptions
- Category Tags
Plain Text works great when you want to limit the amount of styling the collaborators can do - plain text doesn't allow any inline styling, so the output will remain clean/unstyled.

Use Rich Text for long-form content or areas of the website where you and your collaborators might need multiple paragraphs, headings, or inline media such as videos, images or links. Rich text also allows CMS Editors to add further text formatting such as bold, italics and underline.
Rich text comes in handy when you want to give collaborators the ability to further style text - if you don’t want collaborators to have this ability, the Plain Text field will be the better choice.
You may also add additional media (other than text) into a rich text field. Simply click 'Enter' to access a new line, then click the + icon.

You will be provided with additional elements that can be added to your content, including:

With the Rich Media option, you may add content from a variety of sources, including:

Upload images from your computer and use them as a dynamic element for your individual collection item. CMS Editors can then use this image as both a regular image element or a background image within dynamic pages and lists.
- Profile Picture for Authors or Team Members
- Blog Thumbnail Image
- Background Images
- Icons
Sometimes it’s best to have multiple image fields when working with different placement across your site. For example, a different image may be used on a thumbnail than the detail page banner background.

Add videos via a link from an online video host like Vimeo or YouTube. CMS Editors can then paste in the video link from 3rd party video sites like Vimeo or YouTube, and you can preview the video directly in the editor before publishing.
- Marketing Video for Landing Pages
- Product Description Videos
- Videos for Resource Pages (i.e. tutorial and how-to videos)
The video field will already work across all devices, so you and your collaborators won’t have to worry about mobile responsiveness.

The link field allows CMS Editors to add urls to this collection. As the designer you can use the value of the link field for buttons, links in the collection pages, and other linkable objects.
- Any link(s) to locations off of your website
- Registration links to 3rd party event services (like Eventbrite)
- Social media links (such as Twitter, Facebook or LinkedIn)
You can also add inline links by using the Rich Text Field.
The Number Field is similar to Plain Text, in that it allows you to create a non-rich text field. However, this field should be used when the input is meant to be a numeric value. CMS Editors can then insert an integer with or without decimals within the Editor.
- Ratings
- Rankings
- Sorting Value
- Pricing / eCommerce
The number field is a great field to sort by when you want to sort a dynamic list in a specific order.
This field allows you to create both a date and time field, which will display itself as a date picker for CMS Editors when creating an item in this collection.
As a designer you are given multiple methods of displaying this data, allowing you to customize which portion of the date/time you want to display (month, day, year, time - and any combination of these).
Webflow automatically tracks dates and times for Date Created, Date Published, and Date Modified, so no additional field would need to be created for these.
- A date or time in the future (upcoming event, release date, etc)
- A date or time in the past (birthday, historical date, etc)
You can pull from the Date/Time field multiple times within your designs - allowing you to create unique layouts and options to display divided portions of a date (days, months, and years) and time (hours).

The Switch Field is primarily a filtering tool. For example, you could create a field labeled "Featured?" for Blog Posts, so CMS Editors could choose items to showcase in a different way.
As a designer, you can filter to showcase items depending on whether or not the switch is activated. For example, you could design a separate area for Featured Blog Posts, where a dynamic list would only show items that have an activated switch.
- To callout a specific a item or items by adding a switch for Featured (blog posts, products, services, etc)
- Add a switch to Hide specific items until ready to be displayed in certain areas of your site
Use switches to help in filtering out the items you want to show in a Dynamic list.

As a designer you can allow CMS Editors the power to pick a color that can be used to style different elements like background color, text, and border color. CMS Editors would be given a color picker to select any number of colors themselves.
- Style Background Colors
- Style Border Colors
- Style Font Colors
- Changing color(s) for Featured items
- Changing color(s) for On Sale items
Having a color picker allows your collaborator to callout certain items in a unique way, like a Featured Blog post or an On Sale item.

This powerful field allows you to link to other collections within your website, allowing you as the designer to build pages that pull data from different collections. For example, if you have Collections called Authors and Blog Posts, you could create a Reference Link from Blog Posts to Authors, so you can reference specific details within the Author collection without having to manually enter it for each Blog Post.
CMS Editors would see this as dropdown field, allowing them to pick from the items within the collection you are referencing to.
- To link a collection of Authors to a collection of Blog Posts
- To link a collection of Categories to a collection of Blog Posts
- To link a collection of Services to a collection of Team Members
It’s great to use a Reference Link when two things happen - the first is you and/or your collaborators find yourself repeatedly typing in the same input, and second, that input is an item that has the potential to change. For example, it makes sense to create collection for Authors, since you will repeatedly have to add an author to a Blog Post, and if the Author information was changed (perhaps the last name, or profile picture), it would need to be updated for all Blog Posts iassociated to it.

Just like a Single Reference Link, the Multiple Reference Link enables you to reference other Collections on your site. But it’s even more powerful in that it lets you reference multiple items within a Collection and display them as a list on your Dynamic Template Page.
CMS Editors would see this as a dropdown list where they can select multiple items to reference to. A common example would be to link multiple Authors to a single Blog Post.
- To link multiple Authors from a collection to a Blog Post.
- To link multiple Categories or Tags from a collection, to a Blog Post.
Remember that by allowing multiple items to be referenced, you are allowing multiple items to be displayed on the collection Detail Page - so it’s important to create a design that can support these varying possibilities.