
Client Billing overview
To date, if you built and hosted a Webflow website for someone else, you’ve had to collect hosting payments from them yourself. Or even worse, had to transfer the site to your client and lost the ability to collaborate.
But all that’s in the past now.
Because with Webflow Client Billing, you can now automate hosting payment management, keep control of the site, and — best of all — set your own hosting price, so you can make a little extra every month.
Setting up client billing is easy. Just check our list of supported countries before you get started.
Note: you must have a verified Webflow account in order to set up Client Billing.
How to set up Client Billing
To get started, head to the Billing Tools section of your Account Settings.
Step 1: Select Your Country
This one’s pretty straightforward: just click on the country you live or do business in. Just be careful to pick the right country, because you can’t edit this later. (Unless you delete your account).
Step 2: Fill out General Information
Next, you’ll pick the currency your bank is set up to accept. This isn’t the currency your clients will be charged in, just the one we’ll pay you in.
So if you’re a British designer working for Brazilian clients, pick pounds, not reals.
Account Details Section
If you’re an individual, Step 2’s super-easy. Just enter your Business Name, personal information, and move on.
Note: your “Personal ID Number” is your SSN (United States) or SIN (Canada). If you live in another country, use the appropriate ID number for your nation.
If you’re a company, we’ll need your Business Tax ID and your Personal ID Number.
For your security
We never store your Personal ID Number on our servers. We encrypt your details before sending them to our payment gateway, where they’re used to verify your identity.
Step 3: Submit ID Document
To verify your identity, upload a high-quality photo of your government-issued identification. This can be your passport or driver’s license.
If you don’t have this handy, you can skip this step and finish later.
We never store your ID Documents. They will be passed directly to the banks to verify your business information.
Step 4: Bank Account Information
The best part of Client Billing is that you set how much you charge your clients every month.
That way, you can include any ongoing maintenance fee you want on top of their hosting costs, giving you extra income every month.
That’s why we ask for your Routing Number and Account Number—so we can direct deposit it in your bank account. If you live in the EU, you'll see a form to submit your IBAN account number.

For your security
We never store or send your bank account information over the internet.
That’s it! Now you can head over to your site’s Billing tab to set up your client.
Setting up clients
After you set up your billing information, you can now set up clients on any one of your Webflow sites.
Step 1: Enter Client Information
We’ll need basic personal information about your client, such as their name, email, and phone number.
Step 2: Enter Billing Info
Here, you’ll enter how much you’d like to profit from this site’s hosting subscription, plus some details about the service you're charging for, and the name that will appear on your client's credit card statements.
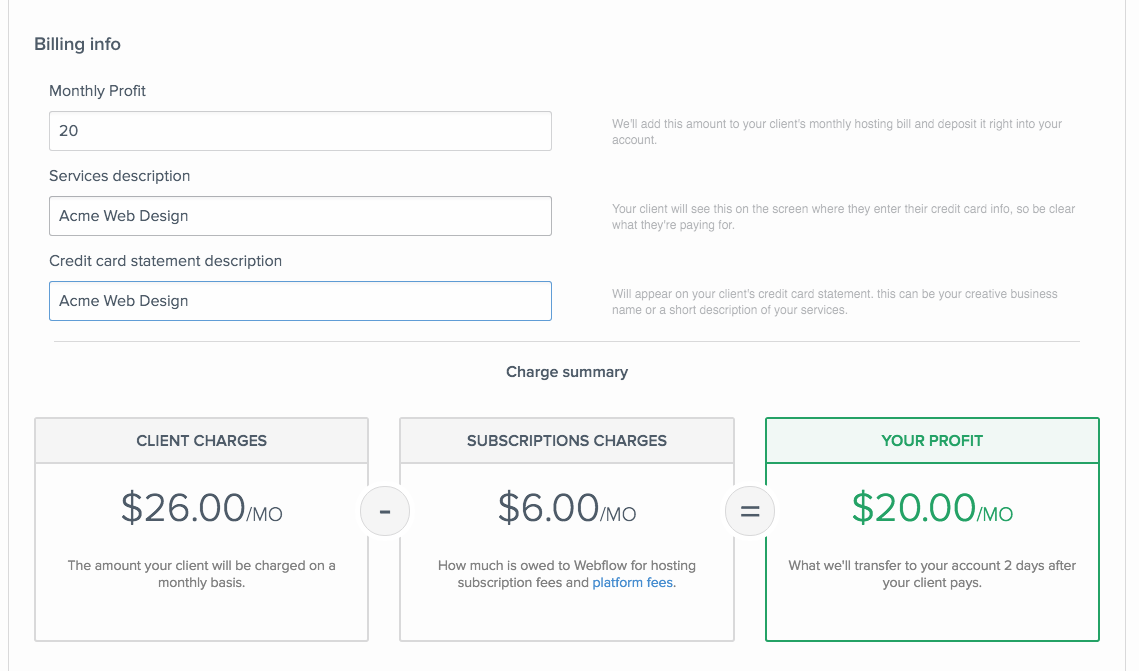
In the “Desired Monthly Profit” field, enter how much you’d like to make each month. We’ll then add that to the the site’s hosting subscription cost, plus a small percentage to cover credit card processing fees (the “platform fee”) to calculate your client’s total charge.
You get to keep every cent you set in the “Monthly Profit” section.
For example, if you want to make $20 a month on a site, and if the site is on the Basic Hosting subscription, the client will be charged $26 a month.
Step 3: Send the payment link to your client
Now that you’ve added all your client’s information, you can send them a link to a page where they’ll add their payment info.
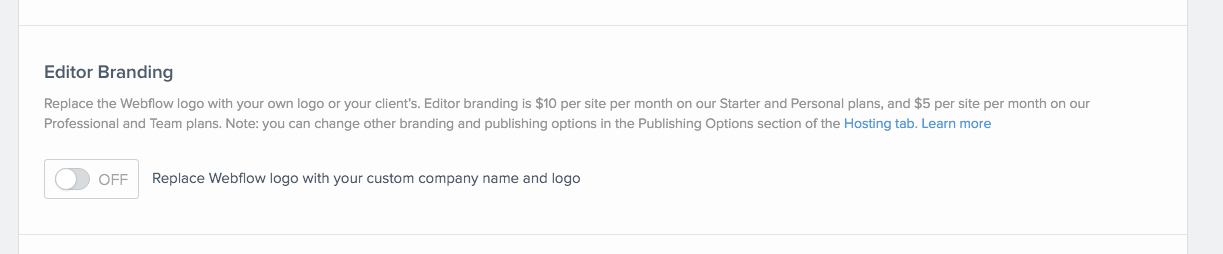
If you’d like to replace the Webflow logo on the payments page with your own logo, you can upload one in the “Editor Branding” section in the CMS tab of your Site Settings:
After your client adds their payment info, all new hosting charges will be billed directly to their credit card. If you’re transferring your own hosting over to Client Billing, the first charge will take place at the end of your site’s billing cycle (within 30 days).
Note: client will use our non-branded URL to submit their payment information.
Step 4: Review your earnings

After you set up a customer, and they add their payment info, you’ll see a list of invoices you can pass along to the client.
To see all the customers you’re managing with Client Billing, and review your earnings, head to to the Billing Tools tab in your account settings.
Frequently asked questions
What countries are supported?
What if I live in an unsupported country?
If you don’t live in one of our supported countries, you can try incorporating your business in one of the supported countries. Stripe Atlas makes it very easy to set up a U.S. corporation.
When will I get paid?
Earnings from your hosting subscriptions will be deposited on a 2-day transfer schedule after your account has been verified and your bank information is set up.
Why doesn't the transfer amount match my Monthly Profit setting?
This is because we apply a 10% platform fee from this amount to cover the credit card processing fees and to help with the costs of maintaining Client Billing for you.
Why am I limited to 22 characters in the Credit Card Statement field?
This is because credit card companies only allow very limited characters for this field (most use 26, but some only allow 22).
Oops! Something went wrong while submitting the form
Oops! Something went wrong while submitting the form
No related videos.


No items found.
